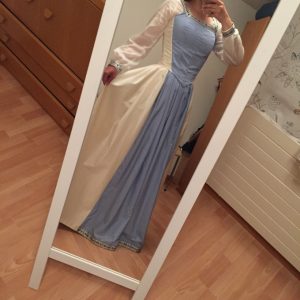
Welcome to the first post on my blog. I finally decided, that I’d love to write about something and the topic is one of my most important hobbies: sewing. I have already made some things but never tried to sew something historically inspired or historically accurate. This was my first time (only inspired so far…). I call this set medieval inspired, but also fantasy inspired. It has nothing to do with medieval fashion, to be honest, I was inspired by the elongated shilouettes of the time. The design itself is based on different elements that I like that should have a medieval vibe in combination. This set, that I finished yesterday, basically shows what all my female comic characters were wearing, when I tried to draw something inspired by the Middle Ages.
The set includes a blouse, a bodice with boning and a skirt. The skirt fits a little tight and the bodice is just right when laced up but reduces not that much, since I made it a little too big.
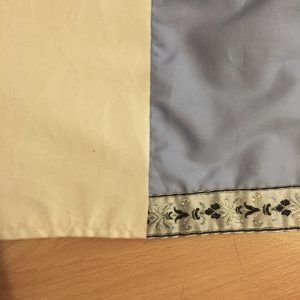
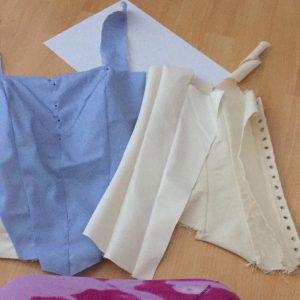
Pattern and design where made by me and I used 2 meters of a cotton and velvet mixture (ecru), 1 meter of cotton silk (blouse), 1 meter of cotton (blue) and 1 meter of a silver trim to complete it. The trim is from my local fabric store. All fabrics from www.buttinette.com

On this picture you can see my original sketches on this project. I initially wanted to make bliaut sleeves, which would not only be medieval inspired but actually add a medieval element. But I also planned an option with normal blouse sleeves and one with tight sleeves. I initially wanted to attach the sleeves directly to the bodice and decided on the go, that I wanted to have a blouse instead, which was the death of the bliaut sleeves.
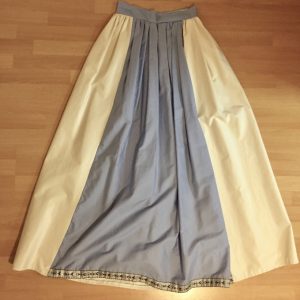
I unfortunately did not take many photos while I made this ensemble. The skirt was the first part I made and it is made from a rectangle, that had three panels (actually too long, but I cannot change that anymore without having to rip open several seams, since the trim is sewed into the sideseams and also secured onto the hem with a running stitch). I added a waistband that I stiffened with interfacing. The waistband is lined with the same material, that I used for the blouse which is a little bit unfortunate, since it is sheer. And I did not use white thread.
There is a seam in the back that closes with snaps and at the waistband I used hooks and eyes as closure. I had to place them in a way that left a gap open, because I did not make the waistband long enough and it did not fit well. Since the bodice covers this part, it is not that bad, but it is still not cool. I know it is there. Here you can see a picture showing the closure in the back.

Doesen’t it look hideous? I am a little bit ashamed… But well, the whole costume worked out nicely in the end, I can live with an ugly skirt… and a not so perfect bodice, which is the next topic of discussion.
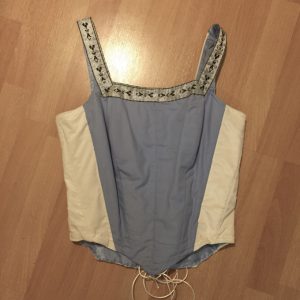
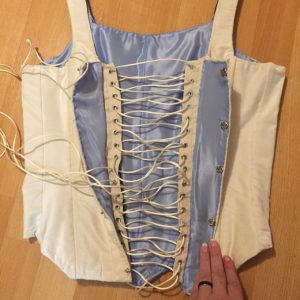
The picture quote is slightely better for the bodice, I actually had my brain on and took some. I used almost all the velvet and lightblue fabric on the skirt and had only bits left. The bodice is made from 14 parts (and since they are all narrow, I managed to cut them out from the fabric I had left) and has lacing in the back, that is hidden by two panels that close with snaps. Three layers went into it, the top layer, the layer with the boning (that I made out of a stirdy and obnoxiously fraying cotton) and a lining layer (made from lining taffeta).
For the pattern, I used the victorian corset I bought years ago as a guide and based the pattern of it. I also laced the bodice the same way. The biggest things I changed were the straps I added and I also made the pieces longer and left a bit more room around my hips.
I started with the layer for the boning, sewed all pieces togeter and then added the boning channels on top. For boning I used two light and very bendable plastic bones (over the bust) and for all the other bones (11 in total) I used spiral steel boning. Then I sewed all the pieces for the top layer together and joined the boning and top layer with some running stitches, hidden in the seams.
I think this is responsible for some of the folds, that are showing while wearing the bodice.
For the lacing I added two more rectangle panels in the seam between the sixth and seventh panel. I used steel eyelits and started on the wrong side. The fabric was also too thick and the eyelits did not completely go through. I used embroydery floss to secure some of them. To lace it up, I’m using a satin cord. (which is far too long and causes folds in the back, because I have to hide it beneath the two closing panels). Here is a picture showing the lacing that like the closure of the skirt, is not the prettiest you’ve ever seen:
Then I had sew the lining pieces together, join all three layers and sew them together by hand. I secured the lining with whip stitches.
The bodice was now complete, apart from the trim and the straps, that I still had to sew together.
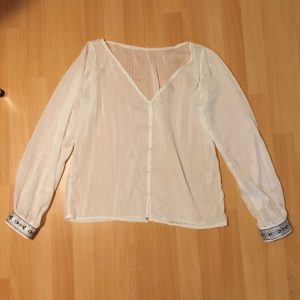
The last thing I made for this, was the blouse. The pattern is relatively simple, I copied the back from one of the blouses I had and used it to create the front too, changing it a bit by adding a v-neck. The sleeves were also pretty simple to draft. I sewed everything together with french seams.

The cuffs are stiffened with interfacing and I also added some of the silver trim to them to make them match the bodice and the skirt. It closes in the front with snaps.
The fabric I used for the blouse is an absolute dream. I have about a meter left, I hope, I can make something pretty out of it one day. For now, it will be stored in my stash until I find a purpose for it.

As you can see, I am pretty bad in sewing snaps on nicely… Well, that’s it for the construction part. I am really sorry for the lack of photos, I’ll do better in the future.
So here are some pictures of me wearing all three items together. I like how they look in the end but this was a project that really thought me a lot because I made so many mistakes. It was a really good lesson in the end, I am happy that I made it.

I hope you liked that post about my medieval inspired fantasy set and I wish you a nice day.