Hello everyone! Welcome to the second post about my robe à l’anglaise. Today I’m discussing all the things that I had left to do: I finished the gown itself, decorated it with ruffles and beads and made a matching hat to go with it.
If you are interested in how I made the underpinnings that I wear underneath or would like to see how I drafted the bodice and made the skirt, you can find the posts here:
All fabric is from Buttinette. Now let’s start with the gown.
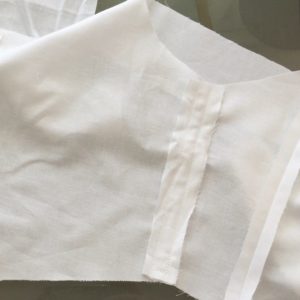
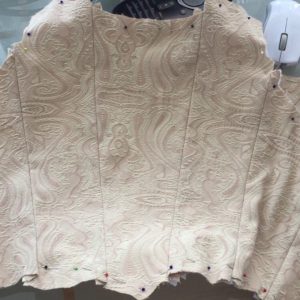
After making the mock up and adjusting the shoulder seams and one of the side seams, I corrected my paper pattern and then cut out all the pieces for the first two layers that are building the bodice. I decided to go with three layers since I did not want the seams of the boning channels to be visible. The base layer is made from the same cotton that I used to make the mock up, but also the chemise, the bumpad and the petticoat. I sewed all pieces together and then did the same with the jacquard pieces.
I managed to pattern match the two front panels, which is cool, I never got so close to match it nicely. After ironing all seams open, I continued by adding the boning channels to the base layer. I used bendable plastic boning for all seams. Since the base layer would be covered and thus protected, I did not bother with zig zagging the channels or be too careful. They will not really fray like that.
Next I joined the top layer and the base layer. I turned the edges inwards and secured everything with whipstitches through the base layer, since I did not want to have any visible stitches on the outside of the bodice.
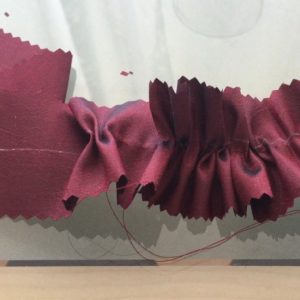
I decided not to make the ruffle around the hem of the skirt, to have some of the red taffeta left to decorate the bodice and the sleeves with. I cut the remaining fabric in stripes (and kept a bigger piece for the hat) with a pair of zig zag scissors to make the ruffles more interesting. This also prevents the fabric from fraying which is great, if you are lazy like me. The edges can be left raw.
Furthermore, I have seen this element on several of the dresses I looked up for reference and wanted to incorporate it somewhere. The stripes were gathered in the center.
After creating the ruffles, I patterned the sleeves. This is basically a copy of my sleeve pattern for the chemise with little alterations. I made it larger for comfort and it also needed some alterations in the shoulder area. The sleeves were cut out and sewed together using french seems. They were cut on the bias to make them elastic, just in case. My sleeves tend to turn out a little small.
Then I started adding the ruffles to the sleeves as well as the bodice. I did this by hand too, using a running stitch.
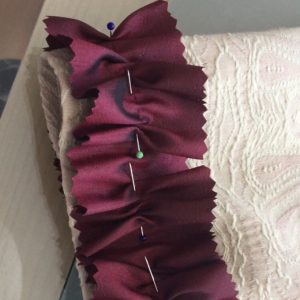
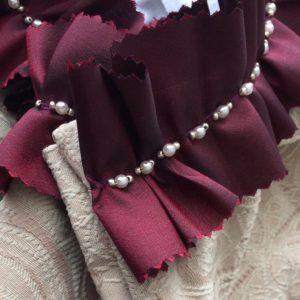
Then I used tiny matt golden beads as well as fake pearls to decorate the ruffles in the center and hide the stitches that secured them to the garment.

The sleeves were sewn in, I was very careful here and pinned the ruffles away, because I did not want to have to take the sleeves off again.
As closure, I decided to add something like a modesty panel on one side of the bodices front. I sewed the snaps and hooks directly onto the bodice itself on one side, and the eyes and ohter parts of the snaps to that modesty panel.
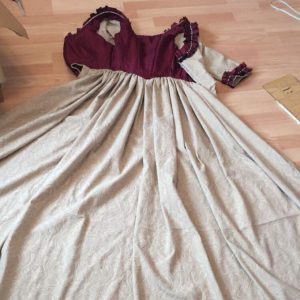
Next I tackled the skirt. It is made from three meters of jacquard. I initially wanted to do cartridge pleats but it did not happen, I gathered the fabric and added it to the bodice. I did this horizontally because of the pattern (I realy hope I’m making sense here…). The skirt was secured by using whipstitches, I directly sewed the salvage to the base layer (to leave no visible stitching).
After adding the skirt to the bodice, I cut it to the right length. I saved the hem for last and instead cut out all lining pieces. I lengthened them at the bottom because I wanted them to cover all stitches (for example the line where I gathered the skirt). Then I started sewing it on around the first armhole, covering the raw edges there. The rest went pretty well, it is done with whipstitches, the only thing that was tricky was the second armhole. I did not mention yet, how much I love this colour combination, didn’t I?
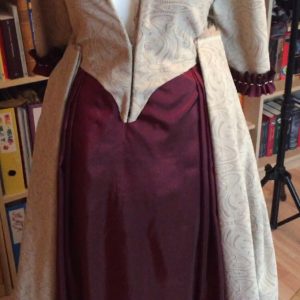
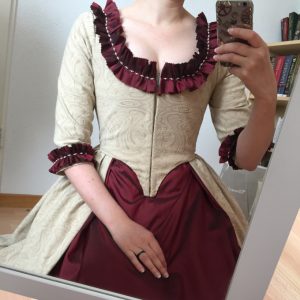
The dress was hemmed and more or less finished. Here are some pictures that show it in full length, the pictures I took with make up on and everything unfortunately only show half of the dress…

And from the side:

I am really happy with the result, I am still surprised, how well my fabric choice, the beads and everything work together. Some problems bugged me though. I talked about it a little above, here are some details. This is what the bodice looked like after I joined the base and top layer. I lost about 1 cm on each side which I did not plan to (but I should have thought about it). The bodice still fits but it is tighter than I wanted it to be.
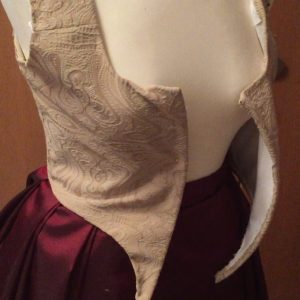
On this picture you can see the “modesty” panel I added. I intentionally made it narrow because I wanted the two bones to be as close to each other as possible.
Since I lost some centimeters there is quite some tension on that closure. And unfortunately, there is a visible gap where the ruffles are. I solved the problem by adding some fake flowers (you will not see them on pictures in this post, maybe in the next one, I’d love to shoot this dress in the automn forest). That is not ideal, but hides the gap.
All in all I am really pleased with this project.
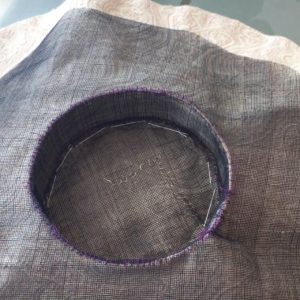
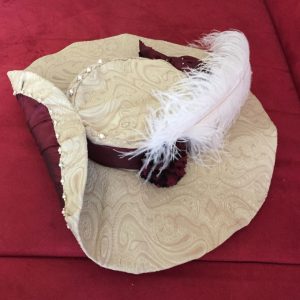
For this costume I wanted to try and make another hat. It is made from three layers, a top layer made from the jacquard, a base layer made from a netlike stiff fabric and the lining that I made from some of the remaining taffeta and satin (I used the satin on the inside and the taffeta where it would be visible). Because I am always short on fabric. For the record, I used fabric from my stash so… It’s not due to bad planning! Just saying. Still glad it somehow worked out without having to piece to much together.
Back to the hat: The pattern is pretty easy, I measured my heads circumference, drew a circle covering it and a second circle around it to create the brim. Then I cut it out. I used the leftover inner circle as a stencil to create the pattern piece for the top of the hat. The last piece is a rectangle, that is as long as the circles circumference (plus 1 cm of seam allowance).
Next, I cut out all pieces. I added 1 cm of seam allowance to all the pattern pieces that were cut out from fabric. For the netstuff I just went with the pattern without adding anything. Also, I reused the inner circle that was leftower after cutting out the brim. I just hat to sew it together where I had to cut it. Then I started by sewing the three layers together by hand. The taffeta stripe for the visible lining was gathered on one side to create some nice folds.
Then I covered the base layer with the jacquard and secured it with some hidden stitches. I should have started with the lining though. I had to secure the lining with beige thread afterwards to make the stitches invisible. Now they are visible on the inside, which is unfortunate.

But I was able to finish the hat nontheless. The last step before I started decorating it was to use the overlapping jacquard and create something like bias binding to secure and hide the raw edges of the taffeta. I would have preferred to have a little stripe of red around the top of the brim, but well, not enough fabric.
Then I decorated the hat with the remaining taffeta, two ostrich feathers and the rest of the beads and fake pearls. I overdid it here… But I still love the hat. Maybe I will remove those randomly placed looking pearls on the top of the hat…
Here are some pictures also showing the details:
On the picture abve you can see the little taffeta flower I created from what was left from the ruffles I made to decorate the dress with. I just pulled the gatheres tight and secured the flower with some stitches. I think it looks cute.

Here you see the inside:
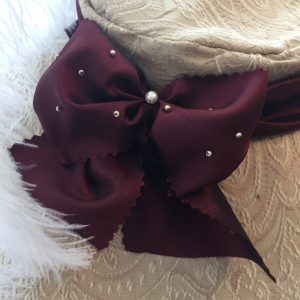
And the bow. I like that bow quite a lot.
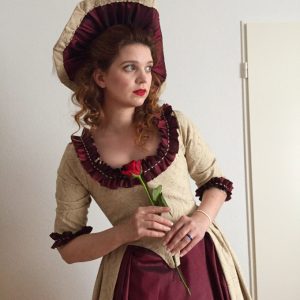
And that’s it! I took some pictures wearing everything (except for the fake flower brooch, I used a rose to cover the gap instead; I also bought a golden choker, not on these pictures too unfortunately) myself, to show something to you since the photoshoot will have to wait for a while… So here you go, I even tried to do something 1780s like with my hair and make up but did not go all the way. They caked that stuff on and I wanted to still look something like socially acceptable. So only nicely draped curls, red lips and too much blush for my taste. Also ignore the chemise, that is slightely visible… I forgot to hide it but did not want to get all dressed up again…Especially after not getting that lipstick everywhere while getting into and out of all these layers.
Here’s the second video about this ensemble on YouTube:

By loading the video, you agree to YouTube's privacy policy.
Learn more
I hope I can soon show you more professional photos. I also hope that you enjoyed this post on my robe à l’anglaise. Thank you so much for reading!

I even managed to smile 😉
