Hello everyone and welcome to my first project of 2020, which is a dress from the early 1910s. I have always loved the shilouhette of this time, the asymmetry, the lace and sheer details etc.
I focus on the years up to 1914. The shilouhette has changed in comparison with the 1900s, more statuesque, less curvy. The corsets got longer as well, as you can see, it extends over my hips. The “neckline” of the corsets also became lower. Here’s the set of underwear I made to go with the dress:
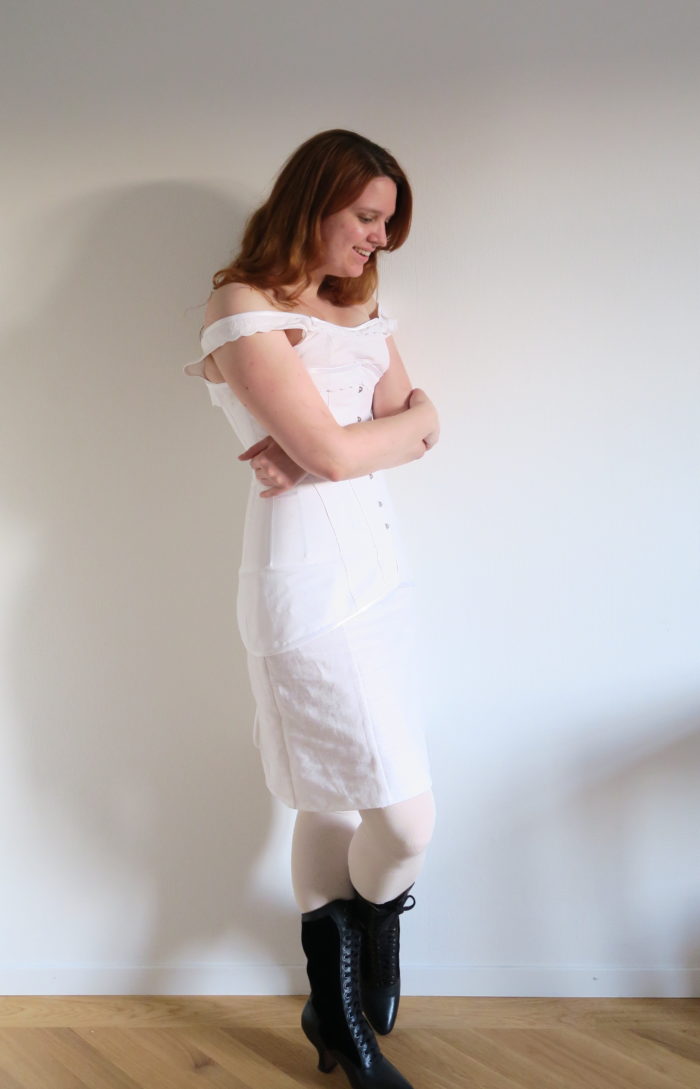
If you are interested in how I made the corset or the chemise, you can find my posts here (my youtube videos are also linked in the posts):
Also, I am wearing my Camille Boots from the American Duchess 😉 If you are interested in my review, here you go. And of course, if you prefer to watch a video, there’s also a video going over the content of this post 😉

By loading the video, you agree to YouTube's privacy policy.
Learn more
Let’s start with some information on my reference dress for this project. This dress is so beautiful and I was instantly inspired. It is by an unknown french label, from about 1913–1914 and it was and (based on some information I found but cannot verify, since it is not from the museum page itself) from the wardrobe of Queen Maud of Norway.

The dress is part of the collection of the Museum of Art, Architecture and Design Oslo. The page seems to be in Norvegian only, so I had to trust Google with translating the information… (I could not get to the english page, but I am pretty sure, there is/was one, I have screenshots that I believe, were actually taken from the English version… There’s construction work going on on their website, so who knows… Some interpretation work was also necessary because Google translate. Just take the information with a grain of salt. Deepl abandoned me on this quest.) Here is some of the information, the Museum provides:
The dress is made from silk and velvet and (somewhere…) satin. The red fabric is machine woven silk with silver threads, the sash is made from velvet, don’t ask me about the satin though… Maybe the butterfly bow in the back? The lace is machine-made on tulle. The dress was partly stitched by machine but there is also hand stitching.
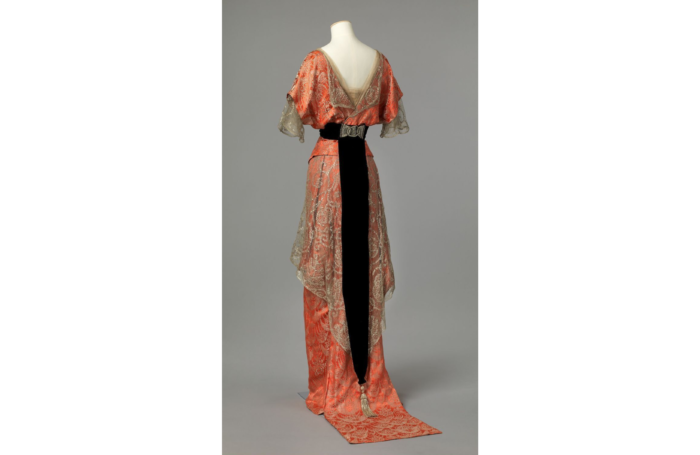
I adore this dress, it looks as if the designer was inspired by Japanese fashion (the “kimono jacket”) but at the same time also by arabic designs (the sash/obi).
It incorporates several elements, that were fashionable at the time, for example:
I will deliberately make the hem wider since I value practicality… There are examples of dresses at that time with wider hems, so I don’t feel too bad for ditching it 😉
First things first, I had to figure out, how this dress could be constructed. I was considering to write to the museum and ask them, if they could tell me, how many parts etc. But then I decided against doing so. I will first try to figure it out myself and then ask the museum for more details and report them back to you, should I receive answers. So this is, what I think is happening here. It looks, as if the dress consists of five different parts:
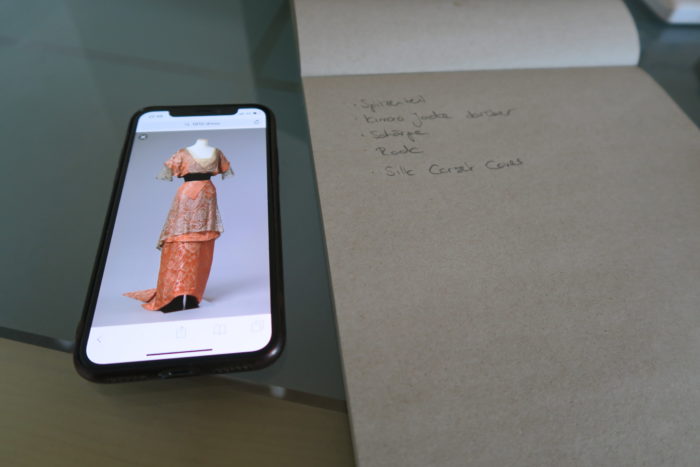
I just had a nice conversation with my godmother, and she suggested that maybe, this is actually a whole dress, not seperate parts… I will keep this in mind while drafting. Let’s see, what works and gives the look I want to achieve 😀
Since red does not suit me, I decided to change the colours completely. From red and black to mint and navy.
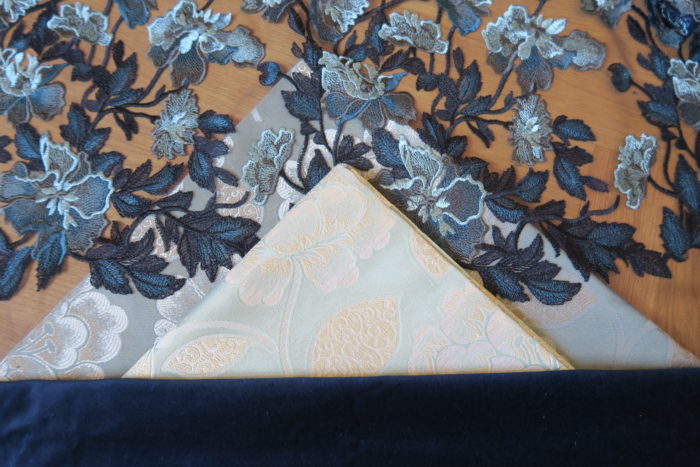
I am short on some of the fabrics… Like always. Never a project where I really have enough fabric 😀 Let’s get into the details:
I bought this brocade on sale in my local fabric store Alja. They only had 2.25 metres. Initially, I wanted to use it for something from the 18th century, but after seeing my reference dress, I knew it would be that one.
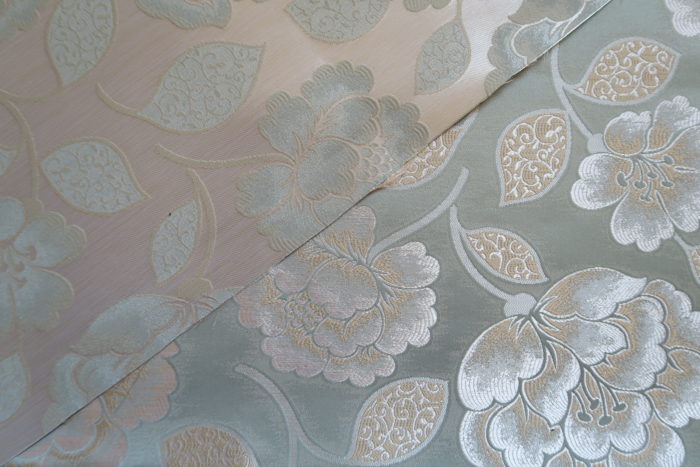
Because I feared, it might not be enough, I went back to the store and asked them, if they knew if one of their other stores that had some of it left in stock. And luckily, another store did! So here’s what we are working with:
This should be enough to get this dress done. Or at least I hope so 🙂 I think, I paid around CHF 70 for each piece (CHF 140 in total), so eventhough it was on sale with 30%, still expensive fabric…
This one was sitting in my stash since the beginning of my sewing quest… I bought it to make the blouse of my Medieval/Fantasy Dress. And I had these bits sitting in my stash ever since 🙂
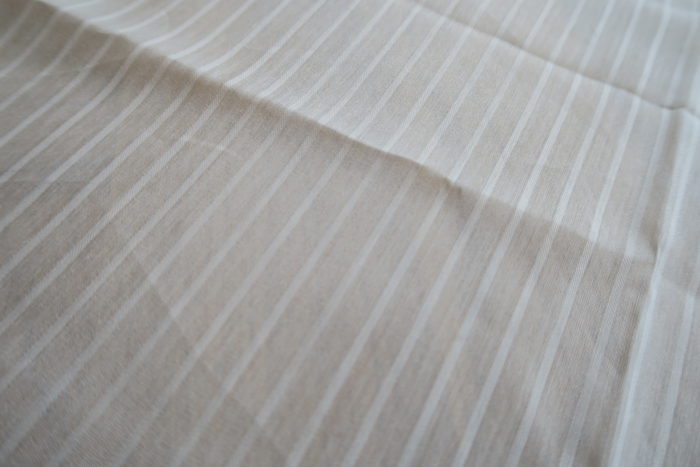
I tried to measure the scraps and this is, what I think I have left:
I have no idea if these few scraps are enough to create that corset cover. For the visible parts it should be enough, and if I am running out, I am pretty sure I can substitute with something for the parts that are not visible.
I cross my fingers… It is a cotton and silk mixture by the way, a very nice fabric from buttinette. I wish, I had bought more back in the day. I have absolutely no clue, what I paid for it back then… Since it’s a silk blend, quite expensive, I guess, but we don’t know for sure… Maybe it was on sale as well, I don’t think that I would have spent too much money on fabric back in the day.
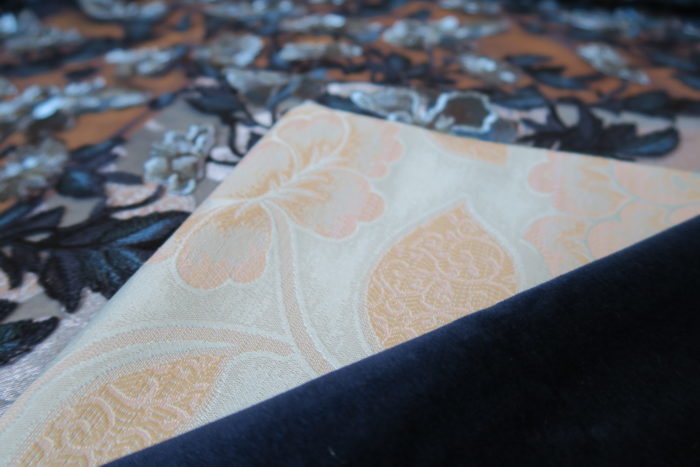
That one was so hard to find. I had some lace in my stash and thought about embellishing it and die it with black tea. But I was never really convinced, that it would be THE fabric. In the end, I found THE fabric by accident and, of course, I am absolutely not sure whether I have enough of it or not… It is a beautifully embroidered mesh (same flowers as on the brocade):

As you can see, the embroidery changes, so that is going to be a challenge to get this lace overdress out of it… Especially, because the original has a high-low hem. I thought, I could turn it around and the flowers would grow to the floor or something… I have to think about that a bit more. But I knew, it was the perfect fabric the moment I saw it… I have 1.15m and paid CHF 79 (tis is also from Alja, btw.)… And it’s gonna be a challenge. I don’t know, if that was wise considering the high price, but it is done and I love it, so we’ll make it work!
I still need to get the beads to decorate the sash as well as buying the material for the tassel (or maybe, if I am especially lazy also the tassel itself… ). But first, I will go through my stash, I remember having some mint and light blue pearls that could work as well as iridescent sequins and beads… But that’s for another day.
I decided to start with the skirt. It seems to be the most complicated thing and I also need it to drape the other parts of the dress on top of it. Then the corset cover. I think, after the corset cover, it does make sence to make the komono jacket first and then, when it is already done, go on with the lace piece. Maybe, it would even make sense to create the “belt” part of the sash at that stage… I guess, then it will be easyer to drape the lace overdress the way right way. And the last thing will be the sash. And maybe some more accessories 🙂 We need gloves and a hairpiece or something as well to complete the look, but I need to do more research there, first.
And that’s it for today’s post! Thanks a lot for reading, I hope you enjoyed this post. I wish you a nice evening, morning, mid of the day, whatever time it is at your place right now.
Love,
Ella
PS: In my last post I showed you my costuming plans for 2020 as well as the Dream Board I made 🙂